Ever wondered how the world cup skiers manage their speed in a race course without skidding or sliding? Well sometimes they do, but there is also another technique they use when they only want to take off a little bit of their speed without sacrificing to much line or direction. That is by playing with the direction of their impulse. Most racers know, or at least have heard their coaches tell them in order to ski fast you have to direct your impulse down the hill. If you do this you will pick up speed when you move from one arc to the next. But what happens if you get to a steep section and you don't want to pick up too much speed. I have heard coaches say that the world cup guys never slow down, but I am not so sure. If that were true, then they would all be skiing on easy runs, far below their ability. I have seen world cup GS courses set on hills that have steep sections as well as flat sections. At least for a masters racer, you would want to know how to manage your speed when you get to a steep section.
If you remember back to the days when you were first learning how to ski, what did your instructor tell you to do when you got going too fast? Turn and ski up the hill. Now a racer is probably not going to want to turn and start skiing up the hill, because they will be out of line, and won't be able to make the next gate. Not to mention it is awkward, because it is easier to link turns when the upper body remains facing down the hill. However if we take the same principle, moving the center of mass up the hill, while keeping the body still facing down the hill, we will get the instant response of slowing down. How do we do this? It is easiest way to do this is at the end of the arc. As you are resisting pressure at the end, just push your feet ever so slightly ahead of your center of mass and resist so that when you feel the impulse, the position of your feet throws your center of mass, back up the hill. It is a bit easier on a steeper hill, blue or black than on a green run. However if you play with it, you will be able to feel the effect it has on your speed.
You can also use the impulse to maintain your speed as well as speed up. In order to maintain your speed, keep your feet directly underneath your center of mass when you create the impulse; this will throw your center of mass across the hill. And the opposite will be true if you want to pick up speed, you throw your feet back just ever so slightly when you create the impulse and then will send the center of mass directly down the hill. This might be a bit scary for the average person, unless you are on a flat section where you want to generate a lot of speed. It is best to practice this on a green run, where you confident with the speed.
This all sounds very easy, but the truth is that it actually more challenging that it sounds. Most advanced skiers do this automatically without thinking about it. However if you are trying to learn the skill, there are two exercises that you can do to facilitate the learning process. The first one is the push the snow: "up the hill," "down the hill" and "across the hill" exercise, where you are literally trying to do just that. For this exercise it is best to choose moderate to flat terrain. When you push the snow up the hill for example, it can be quite scary, because you will pick up a lot of speed. If you have terrain that changes from steep to flat, then that is where you can change how you push the snow. For example on the steep section you would push it "down the hill" and on the flat section you would push it "up the hill." Once you get good at it, you will be able to ski, steep to flat maintaining the same speed.
The other drill is a bit more basic but it is a fundamental skill for learning this technique. Choose moderate terrain, and just ski down with whatever radius of turn you feel comfortable. As you do this, work on pushing the feet forward and back as you go through all of your arcs. You can add a bit of a bounce just to keep your body relaxed, and remaining active in the joints. Once you get a sense of what it feels like to move your feet forward and back, then you can move to more advanced terrain, and try to time it with the conditions dictated by the terrain. For example, if you come to a big clump of snow that is going to throw your feet back, just push them a bit forward and start your turn. Or if you come to a hard mogul, push your feet forward as you go up the back side, pull them back a bit once you are on the top so that you are centered, and then and you go down the back side pull them back a bit more so the center of mass is ahead and your ski tips go down. The feeling is a bit like pedaling a bike backwards with both legs. This skill once it is learned is an invaluable to any skier, especially racers.
Wednesday, January 18, 2012
Tuesday, March 22, 2011
Controlling speed

Friday, March 11, 2011
A different technique?
I spent most of the season skiing on this schedule. One third of my mileage in GS gates, one third in SL gates and one third free skiing with a technical coach. I must admit that although I made amazing gains in my technical and tactical skills in the gates, I spent a lot of time confused by the technical information I was receiving. It really seemed to be in conflict with mt pre-existing knowledge and my own skills. I figured out closer to the end of the season that it is because my technical coach skis using a different technique. I don't know whose technique is right or wrong, or even if there is a right or wrong when it comes to ski technique. I am starting to believe there isn't. What this has left me with thinking is if there is a difference between the technique used in free skiing and gate skiing. Or if there is a difference between race technique and free skiing technique. The goals of these two seem to be different. For example in racing the goal seems to be to get to maximum speed as quickly as possible and then accelerate into each turn once maximum speed is reached. In free skiing it seems as though the goal is to find a reasonable speed to ski at and then maintain this speed with a consistent turn shape as one descends down the hill. I am wondering if the difference in these goals results in different technique using the same set of skills. If a difference exists here are some of the differences that seem to stand out in my mind after this season. With the first skill of stance and balance there seems to be a difference in fore aft position. In free skiing the weight seems to be balanced over the center of the ski or instep of the foot. In racing technique the fore aft position seems to shift within one turn. The weight is balanced over the tails of the skis when the turn begins, then in transfers to the front of the skis at the beginning of the carving phase, and then as the skier progresses through the carving phase the weight shifts back to the tails of the skis again. It is possible that this difference is because a racer might spend more time "riding the ski" than a free skier. Riding the ski is faster because the center of mass moves with the ski and doesn't work against the forces created by gravity. The next difference seems to be found in the amount of steering used. In many cases when watching a free skier, you find steering (pivoting + edging) through all three phases of the turn. This seems to be done in order to control speed. I was able to find one example of free skiing that had minimal steering, but the skier was skiing fast on a moderate slope where there were no other skiers and optimal snow conditions. In this case the run seemed to be more representative of GS freeskiing. In racing turns steering seems to be almost completely absent, and if there is a direction change in a racing turn it seems to be more of a pivot (no edging) and it occurs in phase one just before the skier enters the carving phase of the turn. In this case the skill is used more for an abrupt direction change than it is to control speed.
Another difference that seemed to stand out had to do with the lateral displacement of the center of mass. This I found much more difficult to understand and I didn't really get a sense of this until i got the opportunity to follow my technical coach down the hill on the tails of his skiis. Because his turn shape is much different than mine, this exercise ended up really confusing my center of mass. This caused me to lose the edge pressure on my skiis, making it difficult for me to stay in his tracks. What I figured out from this experience is in the difference between how the center of mass travels down the hill compared to the path of the skiis. My center of mass tends\to travel almost directly above the skiis, on a pathway just slightly inside the pathway of the skiis. Where as when my technical coach skiis, his center of mass travels more inside the pathway of the skiis. I felt this conflict between the two different pathways as I was trying to stay on his path. I did some research to see if this difference occurs because there is a difference between race technique and freeskiing technique. What I found was that it seems to be more of a personal style and it depended on a number of different factors: terrain, course set, traveling speed, turn style etc. My only reflection on this is that lateral displacement of the CM is personal depending on the situation. For example i find it easier and faster to ride the ski, keeping the CM less inside the arc. I find it faster and also easier to generate impulse from the skiis. I also am fairly light, not very strong and ski on a FIS ski. When I use more lateral displacement of the CM I tend to "grind the edges" and find that I don't have the core muscles required to bring my CM out of the turn and forward into the new turn. And this slows me down. However this is only true of moderate terrain, if I am on steeper terrain, I find that more lateral displacement is necessary to control speed. I also find it easier to generate impulse on steeper terrain than flat terrain. Below I have some videos that show some of the differences in technique.
Short radius turns
Slalom turns
Flush technique
Long radius turns
GS freeskiing
I couldn't find a video to show what I mean by "riding the ski" and "grinding the edges," but I did find a video that shows it on a snowboard. The video below shows what happens when the snowboarder laterally displaces his CM inside the arc, verses when he keeps it on top with less lateral displacement. Notice the changes in turn shape and speed.
Carving on a snowboard
I am actually hoping to get some feedback on this post because the ideas from this post came from my own experiences this year and a lot of what I said is based on things that other people have described to me when I asked them specific questions about their technique. I am only building my technical knowledge at this point, so there are a few things that I don't fully understand about differences in ski technique. If you have any technical knowledge on this topic, please feel free to leave a comment on this post, thanks.
Wednesday, March 2, 2011
Using feedback
An athlete learns to improve their skills through reacting to feedback. Feedback can come in many different forms. You can get feedback from the interaction of the skis with the snow, from skiing in gates, or from a coach or other person. When you receive feedback it is important to assess it properly before you decide to react to it. Not all feedback is of the same value as far as improving your results. For example your coach might see something you are "doing wrong" and they might give you a correction for it. But the correction might not actually be the correct solution to improving your results. Sometimes it might be based on something they have "heard" other people say so they pass it on to you, in order to help you. Another example comes from the fact that in racing, when it comes to technique, there is no "right way" or "wrong way" to do something. For example on the world cup you will notice that each racer has a slightly different technique. And at any one time, anyone could win the race. The best example of differences in technique that I can point out is comparing the technique of Kalle Palander and Felix Neureuther on the same slalom course. Kalle uses more inclination to make his turns than Felix does, and Felix uses more angulation than Kalle. Both however are excellent, fast slalom skiers and have the potential to win an SL race at any time.
Kalle Palander and Felix Neureuther
Another example can be seen in comparing the cross-blocking technique of Michael Janyk to that of Thomas Grandi. Janyk uses a very high cross block where he brings the pole guard up in front of his face, where as Grandi used a technique where he keep his pole lower to cross-block when he approached the gate. Neither technique is considered wrong or right, just differences in style. I personally have tried both types of cross-block and I prefer the cross-block where you keep the pole lower, because it helps with the timing of angulation when approaching the gate. I think it is a personal preference. Mike Janyk is able to angulate well with a high cross-block so I think the technical difference is irrelevant. I was not able to find footage of Grandi online but I did find some of Mike Janyk. Notice how high he brings the pole in front of his face when he cross blocks.
Mike Janyk
What is important to understand when you receive feedback is that you need to evaluate the feedback before you decide to react to it. Feedback that you receive from another person is based on an opinion from the other person's perspective. Because there is no "right way" or "wrong way" when it comes to technique, the feedback you receive must be able to make an improvement in your skiing from your perspective, in order for it to be valuable to you. For example, if someone tells you you need to ski with your hands more forward. That is ok, you can try a run or two like that, but if you do that and it doesn't create an improvement, then I would discard the feedback. Anytime I receive feedback I consider it, but if doing it doesn't make me either "ski faster," "ski more efficiently" or "ski smoother." I throw it away. I will make notes about it, but I don't allow it to change how I ski. This is how I propose you handle the feedback that you get, especially if you are experienced. Also the feedback you receive may not always be in line with your personal goals. For example, some people don't necessarily want to ski faster. They may want to feel more stable or more in control. Making a change in your technique that makes you ski faster can sometimes be scary. Especially if you haven't developed the tactics required to manage such an increase in speed.
Saturday, February 19, 2011
Adjusting technique to match course set
Just how often is the course set to match you particular style of turn shape? And the technique you use to make it? Maybe if you are a FIS racer you see more consistency with regards to how courses are set, however most of us are exposed to different styles of courses and sometimes they vary a lot from course setter to course setter. In order to understand how to modify your technique from a tactical perspective, we need to look at some terms for describing course sets first. The corridor is the space between the red and blue gates as you look up the course. The width of the corridor can also be called the "horizontal offset"

 The vertical offset can also change as you down the hill. Now that we have discussed the terms that describe how a course can be set. We can look at what changes you might have to make to your technique in order to adapt to different course sets. Here are some examples of ways you can adjust your technique to allow for changes in the width of the corridor.
If your course set has a wide corridor you will have to somehow get your center of mass or body to travel across the hill more in order to be able to turn around the gates. By either increasing the amount of inclination you use in your turn, or pivoting your feet more in your turn, you will be able to get your body to move across the hill more. This will allow you to be able to turn around the gates in a wide corridor. You might even find that you need a combination of both more pivoting and more inclination, depending on how the course is set. See how both of these changes will affect your turn shape below.

That was really difficult to draw with a computer mouse, however I am trying to show the different between what the turn shapes look like. Increasing your inclination makes more of a "zig zag" turn, where your body spends less time traveling across the hill. Increasing the amount of inclination, will make your run faster for this reason. With pivoting the turns have more of an "S" shape. In this case your turns will take longer because your body spends more time traveling across the hill, resulting in a slower run. You might even use a combination of these skills, it depends on how fast you want to travel as you descend the course. Let's now take a look at how to adjust your technique for changes in vertical offset. With changes in vertical offset you would adjust as follows.
Longer vertical distance (offset) Shorter vertical distance (offset)

The width of the corridor above seems to be very cosistant all the way down, however it is important to note that sometimes the width of the corridor changes as you go down the course, especially if the pitch starts to flatten out as you descend. A popular way to deal with this terrain change is to decrease the width of the corridor as the slope starts to flatten out. This makes it a little easier for racers to carry their speed as they come down onto the flats. Another term which is also important to understand is a term called vertical offset or sometimes simplified to "offset." This means how far apart the red and blue gates are as you go down the hill. The vertical offset can be estimated by using your ski as a measing tool, and sliding down the hill from one gate to the next. Horizontal offset is usually estimated by "eye," from looking up the hill at the width of the corridor.

Wide corridor Narrow corridor
-more inclination -less inclination
-more pivoting. -less pivoting.
If your course set has a wide corridor you will have to somehow get your center of mass or body to travel across the hill more in order to be able to turn around the gates. By either increasing the amount of inclination you use in your turn, or pivoting your feet more in your turn, you will be able to get your body to move across the hill more. This will allow you to be able to turn around the gates in a wide corridor. You might even find that you need a combination of both more pivoting and more inclination, depending on how the course is set. See how both of these changes will affect your turn shape below.

That was really difficult to draw with a computer mouse, however I am trying to show the different between what the turn shapes look like. Increasing your inclination makes more of a "zig zag" turn, where your body spends less time traveling across the hill. Increasing the amount of inclination, will make your run faster for this reason. With pivoting the turns have more of an "S" shape. In this case your turns will take longer because your body spends more time traveling across the hill, resulting in a slower run. You might even use a combination of these skills, it depends on how fast you want to travel as you descend the course. Let's now take a look at how to adjust your technique for changes in vertical offset. With changes in vertical offset you would adjust as follows.
Longer vertical distance (offset) Shorter vertical distance (offset)
-less pivoting in the early part of the turn -more pivoting in the early part of the turn
-less angulation in the early part of the turn. -more angulation in the early part of the turn.
These changes are more difficult to explain because changing your technique based on vertical offset has more to do with the time spent in the turn as opposed to the direction which the center of mass is traveling. I will try to explain it as best as I can. If you have a longer vertical distance between gates you can spend much more time making your turn. For example if you are skiing on a 19m radius ski and your gates are set 19m apart you are lucky because you have the option of just riding the arc of your ski. However if your vertical offset decreases to 15m you aren't going to have enough time to fully ride out the arc of your ski, so you will have to shorten one of the phases of your turn in order to make the gate in time. The easiest phase to shorten without sacrificing line or speed is phase 1 of the turn. Instead of carving through phase one of the turn which takes time, you can make a quick pivot to set up for the next phase, or the bottom half of the turn. The other modification you most likely will have to make is to set up for early angulation. This is because if you pivot early in your turn, you will enter the angulation phase of the turn right away. For this reason you need to be set up for it as soon as possible.
The next step is figuring out how to modify your technique based on a combination of different horizontal and vertical offsets. I will use a couple of examples to help describe what you would do in each case. Let's look at an example. Let's look at what we would do if we had a narrow corridor with a short vertical offset. Your approach in this case would be probably to look at using very little inclination with early angulation. This will feel like your movement will be more vertical than horizontal and your hip will come down right away after you extend off your platform. Depending on how short the vertical offset is you might even have to shorten the time you spend in your turn and add a very slight pivot at the beginning, in order to make the gate in time. Another example would be skiing with a wide corridor and a long vertical offset. In this case you would probably use more inclination and less angulation in the early part of the turn. If the speed becomes an issue you could using pivoting, however it would have to progress very gradually through all parts of the turn, because you would be spending a lot more time in your turns because of the longer vertical offset.
Modifying your technique, to adapt to different course sets is one of the most challenging tasks an alpine ski racer faces. For this reason they must practice variation in how they make their turn shapes when they are out free skiing. What to use, and how much of it to use takes experience. The key is to practice when you are out freeskiing, so it is much easier once you get in course.
Friday, February 11, 2011
Understanding fore aft balance and movement
If you are an athlete involved in alpine ski racing you have probably heard at one time a coach tell someone to move more forward. What this means is that the athlete is struggling with their fore aft balance. In dynamic skiing, there is a shift in pressure that happens along the length of ski as one carves a turn. As you enter the "carving part" of a turn the pressure is shifted to the front of the skis in order to engage the tips of the skis. Then as the carve progresses the pressures shifts from the front of the skis to the back of the skis. This shift in pressure allows the skier to maintain their speed throughout the turn. To allow this type of pressure shift, the skier must actively adjust their upper body postion with respect to their lower body or feet position. This can be accomplished in two ways: shifting the feet back and forward, or moving the upper body forward and backwards. On very flat terrain it feels like a rocking motion, especially when exaggerated. If a coach has ever told you to move forward more, it may mean one of two things: either you are skiing in the "backseat" with the pressure on the tails of your skis during all phase of the turn, or you aren't allowing the pressure to shift back at the end of the turn. The difficult part of understanding how to perfect your fore aft balance is to understand when and how you shift the pressure from the front of the skis to the back of the skis. This is what I will try to explain in detail. In a carved turn, there are two basic stages: The "float" stage and the "bite" stage. The "float" stage of the turn is the part of the turn where there isn't a lot of pressure on the skis with respect to their contact with the snow. At this stage you feel "light" on your feet and your skis may not even have contact with the snow. This is also sometimes called the "unweighting" stage. In dynamic skiing this is also where you would be releasing the pressure from the previous turn, finding your ski platform to set up for the new turn, and pivoting your feet to create a direction change. The time spent in this stage depends on the type of arc you need to create to maintain a good line. This stage is also where you might use "drifting" if it is required to maintain a good line. The second stage of the turn is called the "bite stage." In this stage the skis are in contact with the snow and you are applying pressure to the ski to get the ski to bend and create an arc without pivoting. In this stage the racer may also be using pressure and impulse to generate speed and accelerate out of the turn. The time spent in this stage also depends on the type of arc required. It is important to divide the turn into these two phases to understand how to perfect fore aft balance. In the carve stage the pressure shifts from the front of the skis to the back of the skis. So when a skier finishes their turn, the weight or pressure will be on the back or tails of the skis. During the carve phase however, the pressure needs to be at the front of the skis at the beginning, for this reason the skier must actively shift their weight from the tails of the skis to the front of the skis, and this shift must happen in the "float" stage. Lets look closely at an example of world cup skiing.
Fore aft movement during float phase
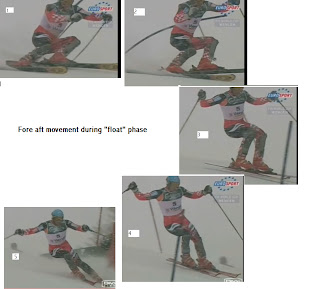
Notice in the photo above that the skier makes an abrupt movement to bring their weight forward to engage the tips of the skis in preparation for the carve phase of the turn which is shown in the photo below. Note that the carve phase is shown at the opposite gate because the camera provided a better angle at the next gate for frame shots.
Pressure shift during "bite" phase
 Notice where the snow is coming off the skiis in each frame above. This gives an indication where the pressure is on the ski with respect to the snow. In the first frame the snow is coming off the tips where as in the last frame it is coming of the tails of the skis.
Fore aft movement during float phase
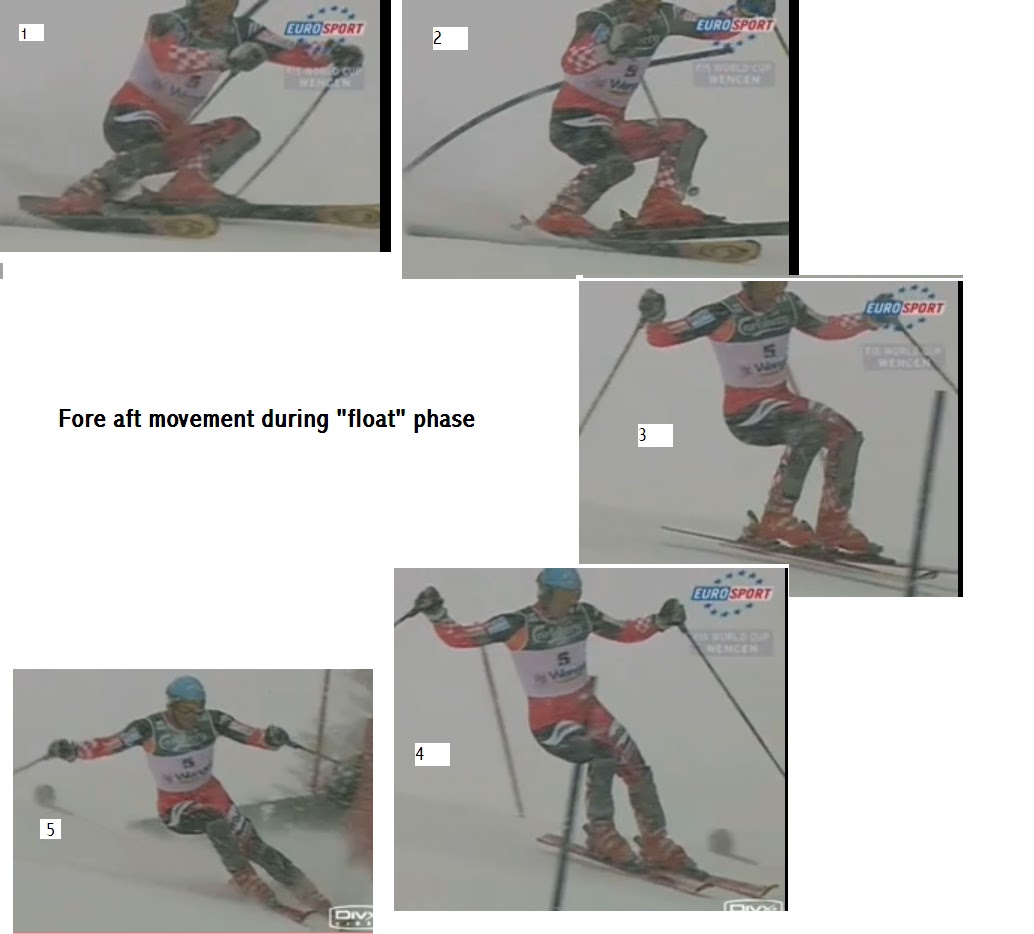
Notice in the photo above that the skier makes an abrupt movement to bring their weight forward to engage the tips of the skis in preparation for the carve phase of the turn which is shown in the photo below. Note that the carve phase is shown at the opposite gate because the camera provided a better angle at the next gate for frame shots.
Pressure shift during "bite" phase

Wednesday, February 9, 2011
Early angulation
Many people have different opinions as to whether you should use early angulation in a GS turn. If you define angulation as "angle" of the upper body with respect to the lower body then early angulation will probably help you maintain edge pressure during the early stages of a GS turn. Me personally, I like to use early angulation because I find that I can hold a tighter and faster line than I can without it. I also find that I benefit from greater stability in a course with early angulation. Early angulation isn't as critical in free skiing, and I don't tend to focus on it as much if I am just out skiing and not running gates. Recently a coach from the U.S told me that angulation is created with the spine, so when I think of applying early angulation in a course I think about keeping the upper body as upright as possible with respect to the lower body. Here are some resources that help foster the understanding of early angulation and how to apply it in a GS turn.
Frame by frame shots of Carlo Janka in a GS turn (taken from video from: www.youcanski.com)
 I used a basic drawing program to superimpose the lines onto his different body positions, and they aren't perfectly accurate, however the idea is to show the angles of his upper body with respect to his lower body. This early angulation will allow him to hold a tighter and faster line. This extreme example of early angulation is not as critical in free skiing, as shown in the next photo below. In free skiing the angulation can be less dramatic and still create a dynamic GS turn. The photo below also comes from video on www.youcanski.com

One thing to note about angulation is that it is difficult to create angulation if you do not have a rounded spine. Note Carlo Janka's body position in the above photo. His spine is very rounded and this position helps to keep the upper body upright, with respect to the lower body.
If you would like to try applying early angulation, I would consider trying a few free runs where you focus on keeping the upper body as upright as possible throughout all phases of the turn. In order to do this you will probably have to keep your upper body in a relaxed "piked" position to allow for changes in the spine. In phase three of the turn it will probably feel like you are bringing the hip "down" instead of "inside" the turn. This feeling is ok, you will know whether you are angulating properly if you can maintain edge pressure and create a tight "arc." You will find the real benefit of early angulation when you step inside a course. The early angulation will help you maintain a fast and tight line through the course.
Frame by frame shots of Carlo Janka in a GS turn (taken from video from: www.youcanski.com)


One thing to note about angulation is that it is difficult to create angulation if you do not have a rounded spine. Note Carlo Janka's body position in the above photo. His spine is very rounded and this position helps to keep the upper body upright, with respect to the lower body.
If you would like to try applying early angulation, I would consider trying a few free runs where you focus on keeping the upper body as upright as possible throughout all phases of the turn. In order to do this you will probably have to keep your upper body in a relaxed "piked" position to allow for changes in the spine. In phase three of the turn it will probably feel like you are bringing the hip "down" instead of "inside" the turn. This feeling is ok, you will know whether you are angulating properly if you can maintain edge pressure and create a tight "arc." You will find the real benefit of early angulation when you step inside a course. The early angulation will help you maintain a fast and tight line through the course.
Subscribe to:
Comments (Atom)